Join the author on a beginner-friendly journey through WebGL basics and learn how to draw your first red rectangle.
Chit-Chat
Several years ago (back when I didn't know what smog was), I learned about WebGL by chance. Out of curiosity, I looked for some materials to study it more deeply, but for various reasons, I gave up. Years later, I came to the capital filled with "dark smog stories" to pursue my dreams, and due to work reasons, I became very interested in WebGL again. In order to not let my will be worn down by time, I decided to write about the process of learning WebGL, first to motivate myself, and second to maintain the spirit of open-source sharing on the internet, providing some convenience for other learners (actually, the most important reason is to attract traffic to the blog, right?? [Cheeky smile]).
Some Introductions
Due to a busy work schedule, most of my research is done in my spare time, and since working with OPEN GL does require some mathematical foundation, the progress and depth of my research seem to depend on my intelligence, so please be understanding.
Additionally: I have placed some resources that I used during the learning process on Github in the Yes-webGL https://github.com/zmofei/yes-webgl project, hoping to meet like-minded individuals to help improve this project.
Okay, without further ado, let's get into the main topic.
DEMO
The first few articles will start by introducing how to use WebGL to implement 2D patterns, and I will begin from the most basic parts (it may be quite tedious, so please prepare some friends, sunflower seeds, peanuts, etc. to snack on).
In this DEMO, we will draw a red rectangle on the canvas using WebGL:
- DEMO Preview
- http://zmofei.github.io/yes-webgl/demo/drawpoint.html
- DEMO Source Code
- https://github.com/zmofei/yes-webgl/blob/master/demo/drawpoint.html
YES! WebGL! Let's get started
First, let's introduce the process of implementing WebGL.
To implement WebGL, you need to understand some concepts: canvas, vertex shader, fragment shader, buffer.
- canvas: The canvas; if you've used the canvas, you should be familiar with it, WebGL is also presented through the canvas.
- vertex shader: Vertex shader, used to store information related to the image's position, such as coordinates, size, etc.
- fragment shader: Fragment shader, used to describe the color and texture information of objects.
- buffer: Buffer; usually utilized when drawing multiple points or complex textures with
buffer object. In other cases, graphics are buffered in this area and displayed on the screen once buffering is complete.
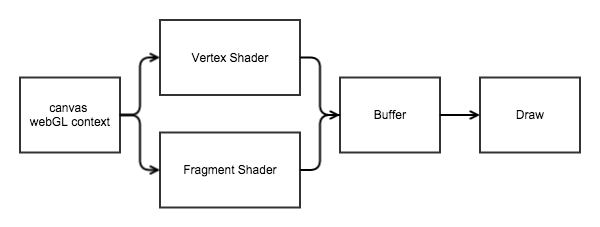
So, how do these terms work together? Let's first look at an image:

The above image describes a simple process for WebGL to handle graphics:
- First, obtain the WebGL context through the canvas.
- Use vertex shader and fragment shader to specify the shape and style of the graphics.
- Put the color and other data of these graphics into the corresponding buffer.
- Draw them on the display.
Just from the literal meaning, this might not be very easy to understand, so let’s go into more detail with the DEMO code.
1. Get the WebGL Execution Environment
HTML
<canvas id="webgl"></canvas>
JavaScript
var canvas = document.getElementById('webgl');
var webgl = canvas.getContext('webgl');
This step is very straightforward; just like using the canvas, before we can render with WebGL, we need to first obtain the execution environment (the context) for WebGL. We start by using getElementById to get the DOM element we are rendering WebGL into, and then use getContext('webgl') to get the WebGL context.
However, it is important to note that we do not handle browser compatibility in the DEMO. In fact, the parameter for getContext could be one of the four: ["webgl", "experimental-webgl", "webkit-3d", "moz-webgl"]. The first one doesn't need much explanation; the second appeared when WebGL was still an experimental feature, and the last two can be inferred from their prefixes.
So, in formal projects, we usually need a method to obtain the WebGL context (for the sake of simplicity in this DEMO, it was not shown. Later, I will provide a library written by Google to initialize WebGL).
/**
 * Creates a webgl context.
 * @param {!Canvas} canvas The canvas tag to get context
 *     from. If one is not passed in one will be created.
 * @return {!WebGLContext} The created context.
 */
var webglContext = function(canvas) {
  var names = ["webgl", "experimental-webgl", "webkit-3d", "moz-webgl"];
  var context = null;
  for (var ii = 0; ii < names.length; ++ii) {
    try {
      context = canvas.getContext(names[ii]);
    } catch(e) {}
    if (context) {
      break;
    }
  }
  return context;
}
After obtaining the WebGL context, we can print its specific value and take a quick look at its __proto__:
"__proto__":{
    ACTIVE_ATTRIBUTES: 35721,
    ACTIVE_TEXTURE: 34016,
    ACTIVE_UNIFORMS: 35718,
    ALIASED_LINE_WIDTH_RANGE: 33902,
    ALIASED_POINT_SIZE_RANGE: 33901,
    ALPHA: 6406ALPHA_BITS: 3413,
    //...
    activeTexture: function activeTexture() { [native code] },
    attachShader: function attachShader() { [native code] },
    bindAttribLocation: function bindAttribLocation() { [native code] },
    bindBuffer: function bindBuffer() { [native code] }
    //...
}
In its prototype chain, we see some constant values like ACTIVE_ATTRIBUTES; these values are identifiers for these properties, and many subsequent operations are bound to WebGL objects using these identifiers, for example:
// Create vertex shader
webgl.createShader(webgl.VERTEX_SHADER);
// Clear color buffer
webgl.clear(webgl.COLOR_BUFFER_BIT);
The parameters in these methods are some constant values in the WebGL prototype chain (like VERTEX_SHADER:35633), and of course, you can also use 35633 instead of webgl.VERTEX_SHADER; it will still work normally. As for whether these values are fixed? I tried several browsers and printed them out through console.log, and found they are all fixed values. My understanding is that these numbers are constant and can identify certain attributes of the WebGL object, much like our ID number uniquely identifies a person.
Conclusion
OK, having obtained WebGL, we are ready to render graphics. Next time, I will share some knowledge related to vertex shaders and fragment shaders with everyone.
Did this post inspire any ideas? Share your thoughts in the comments!