Dive into WebGL rendering flow and shaders to easily grasp the core concepts and code of vertex and fragment shaders.
In the previous article "webGL Learning Notes | webGL Tutorial (1)", we discussed how to obtain the webGL context, which is the first step of webGL—just like an artist getting the paper to paint on. Next, after obtaining the webGL context, we can happily play with webGL.
- DEMO Preview
- http://zmofei.github.io/yes-webgl/demo/drawpoint.html
- DEMO Source Code
- https://github.com/zmofei/yes-webgl/blob/master/demo/drawpoint.html
Rendering Process

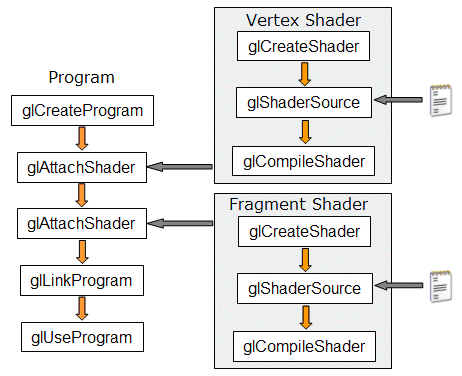
Caption: I originally drew a beautiful picture, but it seems to have been lost during the revision, and I couldn't find it after searching the entire internet. Those who steal articles don't even steal properly; they haven't cached my images, so I can only find one online. Although a thousand alpacas have run through my heart, I still thank the author of the image.
To briefly describe, in order to draw using webGL, you need two things: Program and Shader.
1. Create a program object through createProgram().
2. Create a shader object through createShader(),
   and bind the original shader program using shaderSource(); this will be introduced later.
   After binding, execute compileShader() to complete the creation of the shader object.
3. Bind the shader to the program using attachShader.
4. Link, use, and draw.
Shader
In the code, we see the following two shader segments:
var VSHADER_SOURCE =
    'attribute vec4 a_Position;\n' +
    'void main() {\n' +
    '  gl_Position = a_Position;\n' +
    '  gl_PointSize = 10.0;\n' +
    '}\n';
var FSHADER_SOURCE =
    'void main() {\n' +
    '  gl_FragColor = vec4(1.0, 0.0, 0.0, 1.0);\n' +
    '}\n';
webGL mainly uses vertex shader and fragment shader for rendering.
Here we see that the code in the shader is the string type of GLSL (OpenGL Shader Language) in JavaScript.
GLSL is similar to C language; especially compared to JavaScript, one should pay particular attention to variable types. If you declare a float and then pass an int (like 10), it will result in an error; the correct format should be 10.0, which is somewhat different for JSers.
Typically, we will declare some variables:
attribute vec4 a_Position;
Declaring a variable usually consists of the following format:
Storage qualifier(attribute) Type(vec4) Variable name(a_Position)
Then declare the "entry function":
void main(){
    //code
}
When the code executes, it will execute the code in the main function, which is similar to C-like languages.
Vertex Shader
As the name suggests, the vertex shader is mainly responsible for defining the vertex coordinates, sizes, and other position-related information of graphics.
As shown in the code snippet VSHADER_SOURCE, we define a storage qualifier attribute and a variable of type vec4 (a vector of length 4) called a_Position.
In the main function, we assign the position information to gl_Position and the vertex size to gl_PointSize.
Fragment Shader
The fragment shader mainly defines properties like color.
Here, we simply use gl_FragColor to specify that the color of the point is vec4(1.0, 0.0, 0.0, 1.0).
Rendering Start
Previously, we defined the two most important shaders, and now it's time to assign values and render; the process is quite straightforward.
First, we need to create a GL project:
 var program = webgl.createProgram();
 //This program will be used when binding the vertex and fragment shaders later.
Create a shader object and bind it to the
programfrom (1).Here we take the vertex shader as an example; the process for the fragment shader is similar to that of the vertex shader.
2.1 Create the shader object:
 var VShader = webgl.createShader(webgl.VERTEX_SHADER);
 //createShader method
 //webgl.VERTEX_SHADER tells webgl that the shader being bound is a vertex shader.
 //Similarly, the fragment shader would be webgl.FRAGMENT_SHADER.
2.2 Bind the shader script:
 webgl.shaderSource(VShader, VSHADER_SOURCE);
 //shaderSource method
 //VShader is the shader object created in the previous step.
 //VSHADER_SOURCE is our previously prepared script.
2.3 Complete the shader object script binding:
 webgl.compileShader(VShader);
 //compileShader completes the script binding.
2.4 Bind the shader object to the program:
 webgl.attachShader(program, VShader);
 //program is the object we created in the first step.
 //VShader is the shader object we created in step 2.1.
Link the program and webgl:
webgl.linkProgram(program);Use the program:
webgl.useProgram(program);Draw:
 webgl.clearColor(0.0, 0.0, 0.0, 1.0);
 webgl.clear(webgl.COLOR_BUFFER_BIT);
 //The above two steps are to clear the canvas and reset it to the color we need.
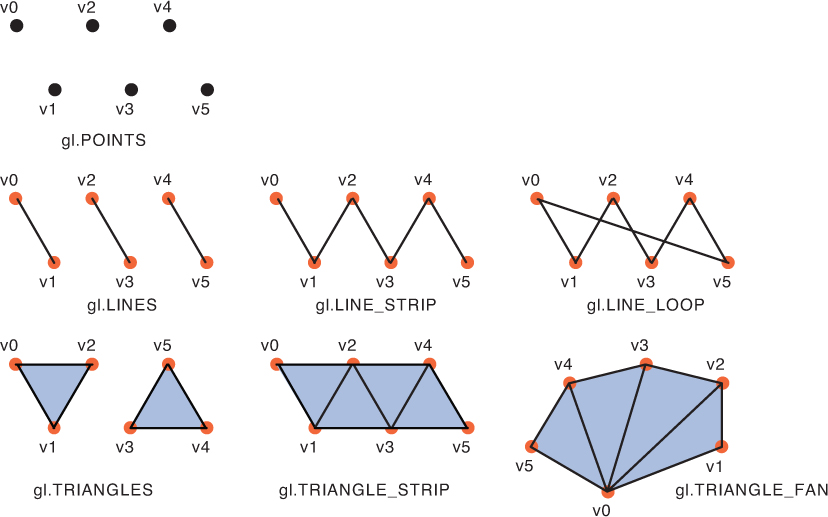
 webgl.drawArrays(webgl.POINTS, 0, 1);
 //drawArrays method has multiple drawing methods; here we need points, so we used webgl.POINTS.
At first glance, the above steps may seem cumbersome, but to summarize:
Create program -> Create shader -> Bind shader to program -> Draw
PS: Let me explain the drawArrays method; the first parameter of drawArrays determines how to "connect" these points. I borrowed an image; naturally, everyone will understand it when they see it. (BTW: The image was found online, and I don’t know whose it is. If the author sees this, please notify me to add a link.)
* Please note the order of points.

As for the second and third parameters, they are easy to understand. They represent the starting point (starting at 0) and the number of points; for example, a triangle can be written as 0 and 3.
## Summary
Alright, we have completed a DEMO development. The initial learning cost of WebGL is relatively high. After mastering the basic knowledge, subsequent learning will be much quicker. I will communicate with everyone in a timely manner about any new developments.
I put a lot of thought into this post—would love to hear your thoughts!