How to Build a ChatGPT App From Scratch: MCP Integration, Custom Widgets, and Real API Examples
When OpenAI launched Apps in ChatGPT, I was curious to see how it worked. I used the APIs from my own blog to build a ChatGPT App. This post walks through the entire process of building it from scratch, with full code included.
Opening: A Curiosity-Driven Build
In October 2025, OpenAI released Apps in ChatGPT, which lets developers create custom apps for ChatGPT. As a developer, my first thought was: Can I make ChatGPT understand my blog?
My blog mofei.life already has public APIs. I used those APIs to build a complete ChatGPT App, and this article documents everything I did.
What Are Apps in ChatGPT?
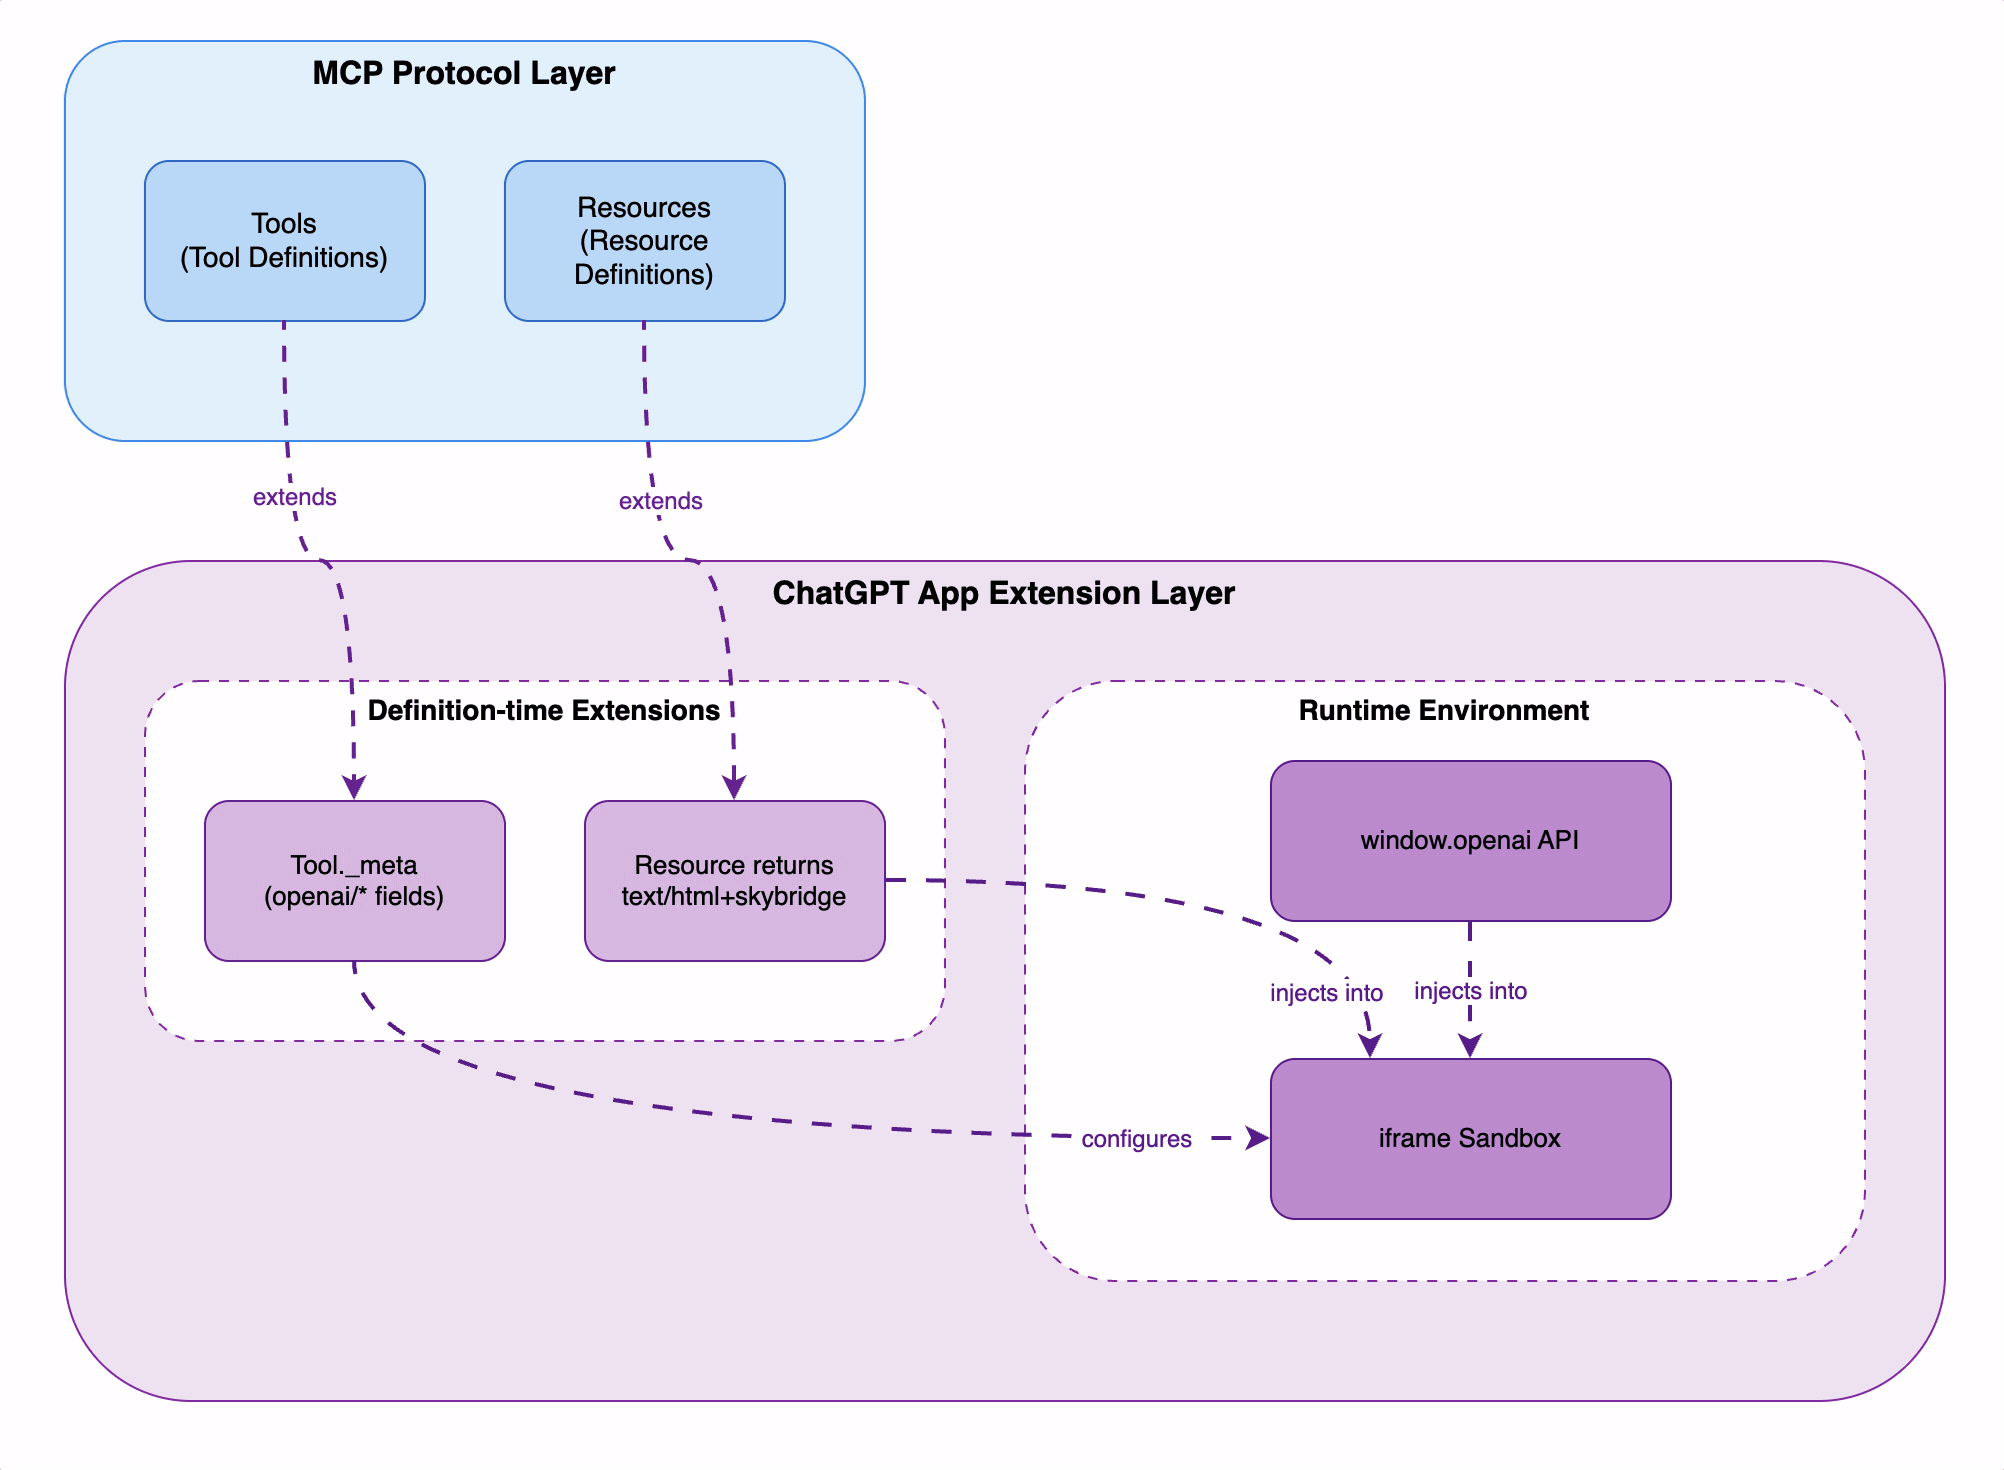
In my earlier article, "Make Your Website or API AI-Ready with MCP Server (Full Guide + Code Examples)", I explained how to wrap APIs with MCP. The new Apps in ChatGPT builds on that, using MCP resources plus custom metadata and a window.openai API. ChatGPT embeds your custom UI directly into the chat via an iframe for a more natural experience.
In short, Apps in ChatGPT is built on MCP (Model Context Protocol) and lets developers:
- Define tools – Tell ChatGPT what functions it can call.
- Show widgets (UI) – ChatGPT can combine tool results with MCP resources and render a polished UI inside the app via iframe.
- Let UI talk to GPT – ChatGPT exposes APIs so your UI can call the ChatGPT chatbox or other features from inside the app.
How it works (diagram):

The flow looks like this:
- User: “I want to read the latest posts from Mofei’s blog.”
- ChatGPT: “Got it. I can call Mofei's blog MCP. I’ll run
list-blog-posts(page=1, lang="en")first.” - Mofei's blog MCP: Returns
list-blog-postsdata and says it can be rendered withui://widget/blog-list.html(the MCP resource named"blog-list-widget"). - ChatGPT: “Cool, I’ll embed that UI and data together in an iframe right in the chat.”
Sounds cool, right? Next question: How do we actually build it?
Goal: A Complete Blog ChatGPT App
After a few days of exploration and coding, I built a full-featured blog ChatGPT App:
Features:
- ✅ Browse blog posts with pagination
- ✅ Read full articles (HTML rendered)
- ✅ Polished visual UI
Stack:
- Backend: MCP SDK on Node.js (hosted on CloudFlare Workers so ChatGPT can call it)
- Frontend: React 18 + TypeScript + Tailwind CSS v4 (for the UI)
- Build: Vite + vite-plugin-singlefile
Demo:
Open source: Full code is on GitHub: 🔗 https://github.com/zmofei/mofei-life-chatgpt-app
What This Article Covers
Here’s what I’ll share from my build. Use it as a reference:
- Relationship between ChatGPT Apps and MCP
- ChatGPT App workflow
- How to build the MCP part of a ChatGPT App
- How to build the widget part of a ChatGPT App
- How to debug a ChatGPT App
All code is on GitHub. You can clone and run it to learn.
If you want ChatGPT to understand your own data, I hope this helps.
How ChatGPT Apps Relate to MCP
Before coding, I spent time figuring out how ChatGPT Apps and MCP fit together. It felt confusing at first, but once it clicked, everything made sense.
What Is MCP?
MCP (Model Context Protocol) is a standard that lets AI models call external tools and access data.
Think of it this way:
- You already have data (blog posts, user info, etc.) exposed via API.
- The AI wants to access that data.
- MCP is the “translator” that defines how the AI should request and how you should respond.
In my earlier post Make Your Website or API AI-Ready with MCP Server, I showed how to expose APIs via MCP. Back then I only used MCP Tools so the AI could call my endpoints.
What Does ChatGPT App Add on Top of MCP?
ChatGPT App is not brand new; it is built on MCP but adds key extensions:
1. Resources for Widgets
MCP already had resources, but ChatGPT Apps use them as UI templates:
// Register blog list resource
this.server.registerResource(
  "blog-list-widget",
  "ui://widget/blog-list.html",
  {
    title: "Blog List Widget",
    description: "Displays a list of blog posts",
  },
  async () => {
    return {
      contents: [
        {
          uri: "ui://widget/blog-list.html",
          mimeType: "text/html+skybridge",
          text: WIDGETS.blogList, // Complete HTML page with all CSS and JavaScript
          _meta: {
            "openai/widgetPrefersBorder": true,
            "openai/widgetDomain": "https://chatgpt.com",
            "openai/widgetCSP": {
              connect_domains: [
                "https://static.mofei.life",
                "https://api.mofei.life",
              ],
              resource_domains: ["https://static.mofei.life"],
            },
          },
        },
      ],
    };
  }
);
This resource returns a full HTML page with all CSS and JavaScript inlined. The widgetCSP is important—it defines which domains the widget can access.
What is WIDGETS.blogList?
You may notice WIDGETS.blogList in the code. What is it?
It’s a React + Tailwind widget compiled into a self-contained HTML file. The build pipeline:
# Run in project root
npm run build:web

# This command does:
# 1. build:widgets - Vite builds React components
# 2. build:loader - build-loader.mjs generates loader.ts
Tooling:
- Vite + vite-plugin-singlefile to pack React, CSS, and JS into one HTML file.
- build-loader.mjs reads the generated HTML and converts it to TypeScript constants.
The final web/loader.ts looks like:
// Auto-generated file
export const WIDGETS = {
  blogList: `<!DOCTYPE html>
<html lang="en">
<head>
  <meta charset="UTF-8">
  <style>
    /* All Tailwind CSS inlined here */
    body { margin: 0; font-family: system-ui; }
    .container { max-width: 1200px; margin: 0 auto; }
    /* ... thousands of lines of CSS ... */
  </style>
</head>
<body>
  <div id="root"></div>
  <script type="module">
    // All React code compiled and inlined here
    const { useState, useEffect } = React;

    function BlogList() {
      // Access data from ChatGPT
      const metadata = window.openai?.toolResponseMetadata;
      const posts = metadata?.allPosts || [];

      // Render blog list UI
      return React.createElement('div', { className: 'container' },
        posts.map(post => /* ... */)
      );
    }

    // Mount React app
    ReactDOM.render(
      React.createElement(BlogList),
      document.getElementById('root')
    );
  </script>
</body>
</html>`,

  blogArticle: `<!-- Similar structure for article widget -->`
};
Why this helps:
- Runs standalone – It’s a normal HTML file; open it in a browser with no server or deps.
- One string with everything – CSS, JS, React all inline, zero external deps.
- MCP resource returns it directly – No extra file server; MCP returns the HTML string.
- Sandboxed in an iframe – ChatGPT loads it safely.
The real loader.ts is 400+ KB because it includes React runtime and all styles.
💡 Debug tip: You can open the widget in a browser and inject window.openai data to simulate ChatGPT. See the “Widget Development” section later.
2. Tool _meta Extensions
Inside tool definitions, the _meta field tells ChatGPT which widget to use:
// Register blog post listing tool
this.server.registerTool(
  "list-blog-posts",
  {
    title: "List Blog Posts",
    description: "Browse and list blog posts with pagination",
    inputSchema: {
      page: z.number().describe("The page number to retrieve").default(1),
      lang: z.string().describe("Language code, e.g. 'en' or 'zh'").default("en"),
    },
    _meta: {
      // Key: Tell ChatGPT to use this widget for display
      "openai/outputTemplate": "ui://widget/blog-list.html",
      "openai/toolInvocation/invoking": "Loading blog posts...",
      "openai/toolInvocation/invoked": "Blog posts loaded successfully",
      "openai/widgetAccessible": true, // Allow widget to call this tool
    },
  },
  async ({ page, lang }) => {
    const url = `https://api.mofei.life/api/blog/list/${page}?lang=${lang}`;
    const res = await fetch(url);
    const data = await res.json();

    // Return three-layer data structure...
    return {
      structuredContent: { /* ... */ },
      content: [ /* ... */ ],
      _meta: { /* ... */ }
    };
  }
);
Common _meta fields
| Field | Type | Description | Example |
|---|---|---|---|
openai/outputTemplate | string (URI) | Which widget UI to render tool output | "ui://widget/blog-list.html" |
openai/widgetCSP | object | Content security policy: connect_domains for API calls, resource_domains for assets | { connect_domains: ["https://api.mofei.life"] } |
openai/widgetAccessible | boolean | Allow widget to call this tool via window.openai.callTool | true |
openai/toolInvocation/invoking | string | Loading message while tool runs | "Loading blog posts..." |
openai/toolInvocation/invoked | string | Success message after tool completes | "Blog posts loaded" |
Other fields include widgetPrefersBorder, widgetDomain, widgetDescription, locale, userAgent, etc. See the OpenAI docs for the full list.
You can set these in two places:
- In tool
_meta– metadata about the tool itself. - In the tool result
_meta– runtime data passed to the widget.
3. window.openai API
This is the key part. ChatGPT injects a global window.openai into the widget iframe so the widget can:
- Read data:
window.openai.toolResponseMetadatacontains the tool result. - Call tools:
window.openai.callTool()can invoke tools (e.g., pagination). - Send messages:
window.openai.sendFollowUpMessage()can post follow-ups to ChatGPT.
// In the widget
function BlogList() {
  // Read data
  const metadata = window.openai.toolResponseMetadata;
  const posts = metadata?.allPosts || [];

  // Pagination
  async function handlePageChange(page: number) {
    await window.openai.callTool("list-blog-posts", {
      page,
      lang: "zh"
    });
  }

  // Article click
  function handleArticleClick(id: string) {
    window.openai.sendFollowUpMessage(`Please show article ${id}`);
  }

  return <div>{/* UI code */}</div>;
}
Full window.openai API
From the OpenAI docs (as of Nov 23, 2025), widgets can use:
Data and state:
| Prop/Method | Type | Description |
|---|---|---|
toolInput | object | Input params passed when the tool was called |
toolOutput | object | Your returned structuredContent; the model reads these fields |
toolResponseMetadata | object | Your returned _meta; only the widget sees this |
widgetState | object | UI state snapshot kept between renders |
setWidgetState(state) | function | Store a new state snapshot after meaningful user actions |
Widget runtime APIs:
| Method | Signature | Description |
|---|---|---|
callTool | callTool(name: string, args: object): Promise<any> | Let the widget call an MCP tool. Requires openai/widgetAccessible: true in the tool _meta. |
sendFollowUpMessage | sendFollowUpMessage({ prompt: string }): Promise<void> | Send a message to ChatGPT to trigger a new turn. |
requestDisplayMode | requestDisplayMode({ mode: string }): Promise<any> | Request PiP or fullscreen modes. |
requestModal | requestModal(...): Promise<any> | Create a ChatGPT-controlled modal for overlays. |
notifyIntrinsicHeight | notifyIntrinsicHeight(...): void | Report dynamic widget height to avoid clipping. |
openExternal | openExternal({ href: string }): Promise<void> | Open an approved external link in the user’s browser. |
Context:
| Prop | Type | Description |
|---|---|---|
theme | "light" | "dark" | Current theme |
displayMode | "inline" | "pip" | "fullscreen" | Widget display mode |
maxHeight | number | Widget max height (px) |
safeArea | object | Safe area insets |
view | string | View type |
userAgent | string | User agent |
locale | string | Locale code (e.g., "en-US", "zh-CN") |
Access APIs in two ways:
- Directly –
window.openai.toolResponseMetadata - With React hooks –
useToolResponseMetadata(),useTheme(), etc. (reactive updates)
Relationship Diagram
How I Think About It
Imagine a restaurant and a central kitchen:
-
MCP is the central kitchen (supplier):
- Provides standard menus (tool and resource definitions).
- Prepares two things:
- Tools provide the food itself (data the AI reads as JSON).
- Widgets provide the packaging (full UI: HTML+CSS+JS via resources).
- Supplies everything to the restaurant.
-
ChatGPT App is the restaurant:
- Orders custom dishes from the central kitchen (expects
text/html+skybridgewidgets). - Once it gets them:
- Puts them on the table (iframe sandbox).
- Provides utensils and waiters (
window.openaiso users can interact). - Labels the menu (
_metafields to describe dishes and use cases).
- Serves the guests (users).
- Orders custom dishes from the central kitchen (expects
In short:
- MCP (kitchen) produces widgets and data and standardizes delivery.
- ChatGPT App (restaurant) presents them, sets rules, and serves users.
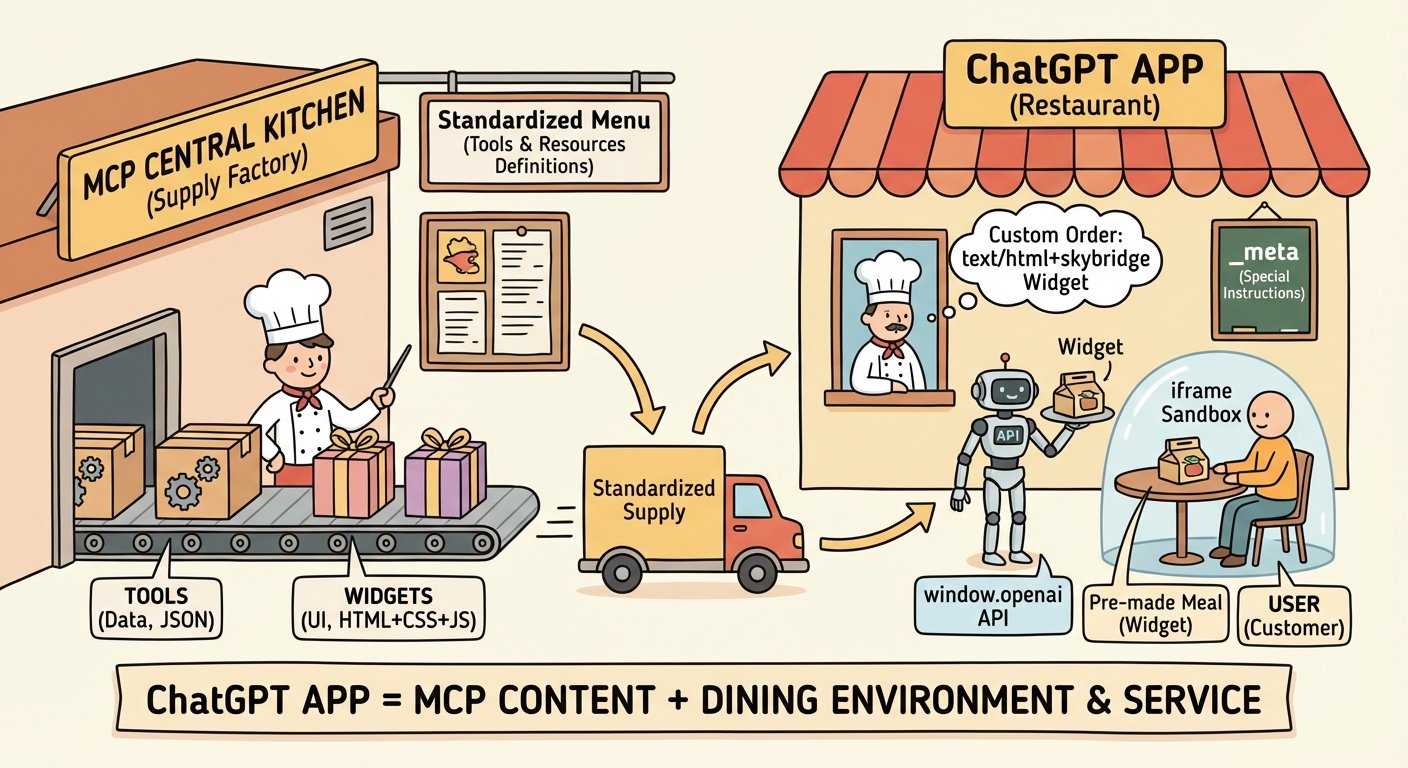
So, ChatGPT App = MCP content + presentation and service.
ChatGPT App Workflow
With the relationship clear, let’s see a full request flow using my blog app.
Full Interaction Flow
Imagine the user says: "Show me the latest articles from Mofei's blog"
Here’s the flow:
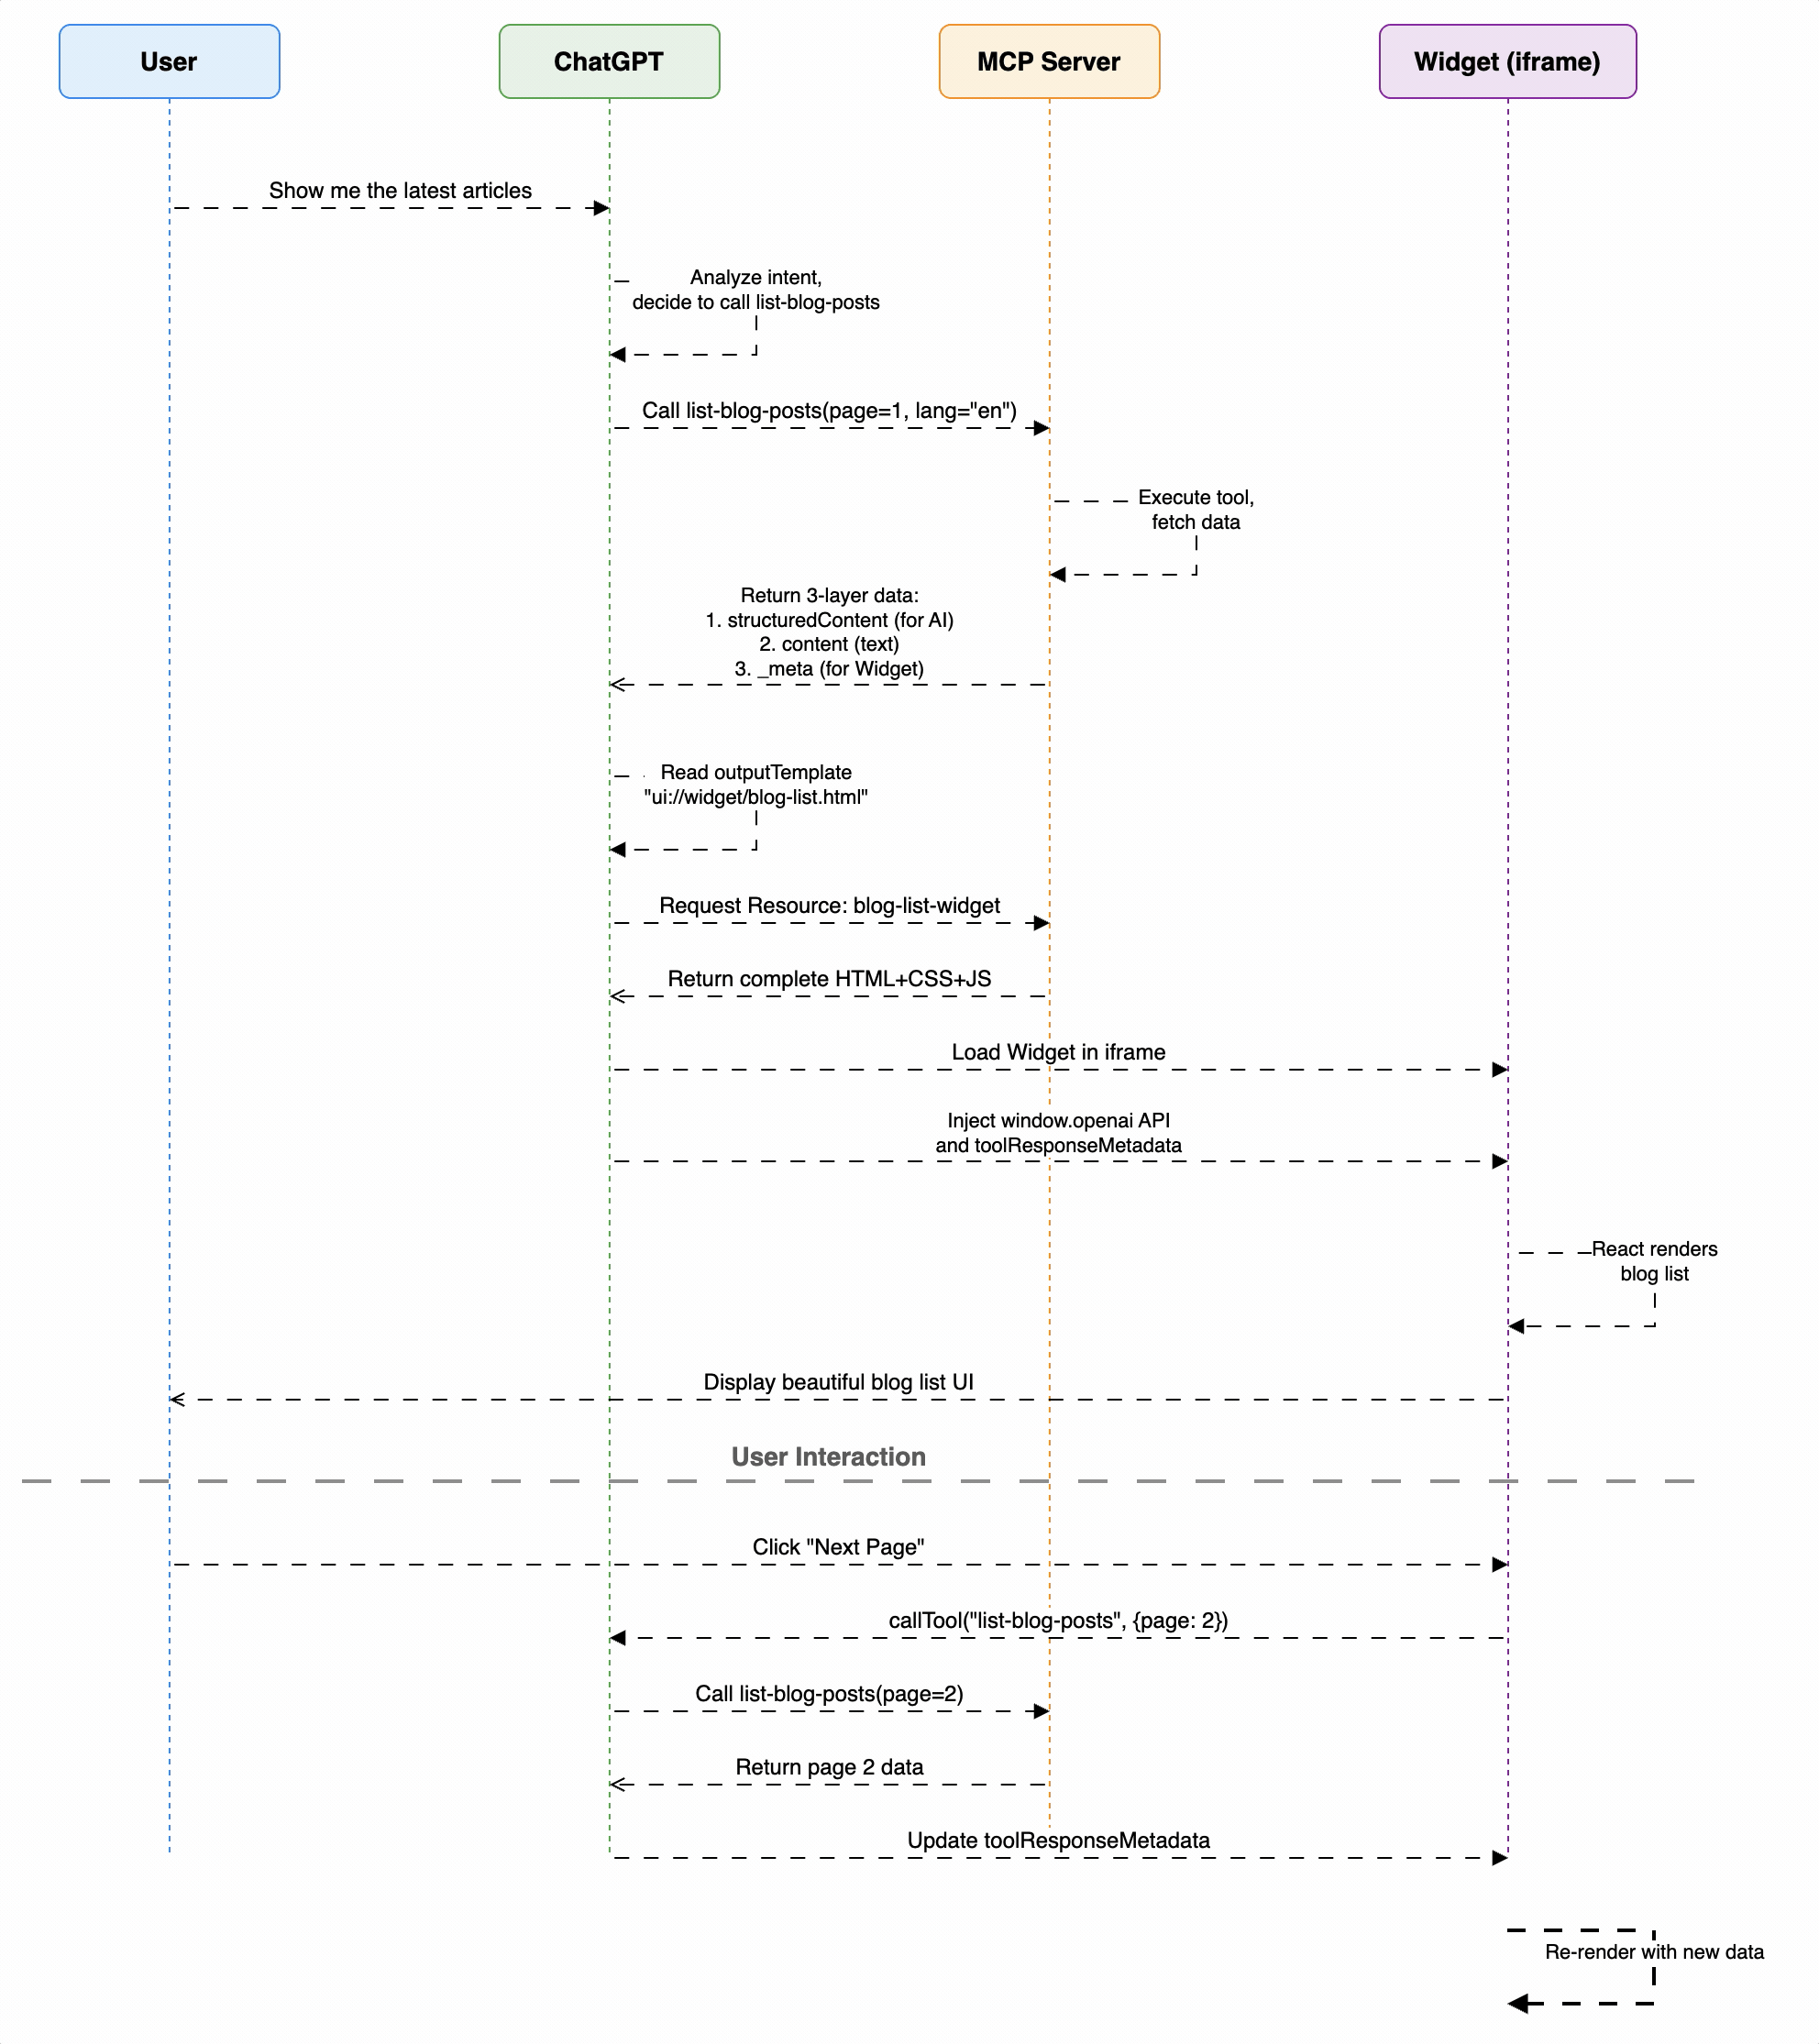
Step-by-Step
1. User request
User types: "Show me the latest articles from Mofei's blog"
2. ChatGPT chooses a tool
ChatGPT sees list-blog-posts fits and calls:
// ChatGPT decides internally
list-blog-posts({
  page: 1,
  lang: "en"
})
3. MCP returns three-layer data
My MCP server fetches from the API and returns three layers:
return {
  // Layer 1: structuredContent - read by the model
  structuredContent: {
    page: 1,
    lang: "en",
    totalCount: 42,
    postsOnPage: 12,
    posts: [
      { id: "123", title: "Article 1", pubtime: "2025-11-23", ... },
      // ... brief summary info
    ]
  },

  // Layer 2: content - shown in chat
  content: [
    {
      type: "text",
      text: "Found 42 total blog posts. Showing page 1 with 12 posts."
    }
  ],

  // Layer 3: _meta - only the widget sees this
  _meta: {
    allPosts: [...], // full list with all fields
    currentPage: 1,
    totalCount: 42,
    pageSize: 12,
    apiUrl: "https://api.mofei.life/api/blog/list/1?lang=en",
    fetchedAt: "2025-11-23T10:00:00Z"
  }
};
Why three layers?
- structuredContent: The model needs to understand the data but not all details (images, styling).
- content: Short text shown in the conversation.
- _meta: Full data for the widget to render a rich UI.
4. ChatGPT reads widget config
ChatGPT sees the tool _meta:
_meta: {
  "openai/outputTemplate": "ui://widget/blog-list.html"
}
So it requests the blog-list-widget resource.
5. MCP returns widget HTML
The resource responds with the HTML string (all CSS and JS included):
return {
  contents: [{
    uri: "ui://widget/blog-list.html",
    mimeType: "text/html+skybridge",
    text: WIDGETS.blogList, // 400KB+ full HTML
    _meta: {
      "openai/widgetDomain": "https://chatgpt.com",
      "openai/widgetCSP": { ... }
    }
  }]
};
6. ChatGPT loads the widget
ChatGPT:
- Creates an iframe sandbox.
- Loads the HTML.
- Injects
window.openai. - Injects the tool
_metaaswindow.openai.toolResponseMetadata.
7. Widget renders UI
React code in the widget runs:
function BlogList() {
  // Read data injected by ChatGPT
  const metadata = window.openai.toolResponseMetadata;
  const posts = metadata?.allPosts || [];

  // Render the blog list
  return (
    <div>
      {posts.map(post => (
        <article key={post._id} onClick={() => handleClick(post._id)}>
          <h2>{post.title}</h2>
          <p>{post.introduction}</p>
          <div className="tags">{post.tags.map(...)}</div>
        </article>
      ))}
    </div>
  );
}
The user sees a polished blog list UI.
8. User interacts with the widget
User clicks “Next page,” and the widget calls:
async function handlePageChange(page: number) {
  // Widget calls the tool directly
  await window.openai.callTool("list-blog-posts", {
    page: page,
    lang: "en"
  });
}
We loop back to step 3: ChatGPT calls MCP again, updates data, widget re-renders.
Key Takeaways
-
Data is layered:
- Model reads
structuredContent(compact). - Chat shows
content(text). - Widget reads
_meta(full data).
- Model reads
-
Widgets are independent:
- Run in an iframe, isolated.
- Can call tools via
window.openai.callTool. - Can send follow-ups via
sendFollowUpMessage.
-
MCP just transports:
- MCP provides tool/resource plumbing.
- ChatGPT App decides how to use them (load widget, inject APIs).
Building the MCP Part
MCP is the backbone: it defines what ChatGPT can do and how. I’ll use my blog app as an example.
Project Setup
I chose CloudFlare Workers to host MCP because it’s free, fast, global, and supports SSE (required by ChatGPT).
Init project:
# Create project
mkdir mofei-blog-chatgpt-app
cd mofei-blog-chatgpt-app

# Init npm
npm init -y

# Install deps
npm install @modelcontextprotocol/sdk agents zod
npm install -D wrangler typescript @types/node
Key deps:
@modelcontextprotocol/sdk– MCP SDK.agents– MCP helper for CloudFlare Workers.zod– Define and validate tool schemas.wrangler– CloudFlare Workers dev/deploy tool.
MCP Skeleton
Create src/index.ts, the MCP server entry:
import { McpAgent } from "agents/mcp";
import { McpServer } from "@modelcontextprotocol/sdk/server/mcp.js";

export class MyMCP extends McpAgent {
  server = new McpServer({
    name: "Mofei's Blog",
    version: "1.0.0",
  });

  async init() {
    // Register tools and resources here
  }
}

// CloudFlare Workers entry
export default {
  fetch(request: Request, env: Env, ctx: ExecutionContext) {
    const url = new URL(request.url);

    // SSE endpoint - ChatGPT calls MCP via this
    if (url.pathname === "/sse" || url.pathname === "/sse/message") {
      return MyMCP.serveSSE("/sse").fetch(request, env, ctx);
    }

    return new Response("Not found", { status: 404 });
  },
};
Key points:
- SSE endpoint – ChatGPT uses Server-Sent Events to call MCP; this is required.
init()– register all tools and resources here.
📁 Full code: src/index.ts
Register the First Tool
Tool registration defines params and the three-layer return:
async init() {
  this.server.registerTool(
    "list-blog-posts",
    {
      title: "List Blog Posts",
      description: "Browse and list blog posts with pagination",
      inputSchema: {
        page: z.number().default(1),
        lang: z.string().default("en"),
      },
      _meta: {
        "openai/outputTemplate": "ui://widget/blog-list.html",  // Specify widget
        "openai/widgetAccessible": true,  // Allow widget to call
      },
    },
    async ({ page, lang }) => {
      const data = await fetch(`https://api.mofei.life/api/blog/list/${page}?lang=${lang}`)
        .then(r => r.json());

      return {
        structuredContent: { /* compact data for the model */ },
        content: [{ type: "text", text: "..." }],  // Chat text
        _meta: { allPosts: data.list, ... },  // Full data for widget
      };
    }
  );
}
The three-layer structure:
structuredContent– For the model; keep it concise to save tokens.content– Text shown in chat._meta– Widget-only; can hold full data, images, etc. The model cannot see it.
📁 Full impl: src/index.ts#L83-L144
Register the Widget Resource
Resources supply the widget HTML:
async init() {
  this.server.registerResource(
    "blog-list-widget",
    "ui://widget/blog-list.html",
    { title: "Blog List Widget" },
    async () => ({
      contents: [{
        uri: "ui://widget/blog-list.html",
        mimeType: "text/html+skybridge",  // Required type
        text: WIDGETS.blogList,  // Full HTML string
        _meta: {
          "openai/widgetCSP": {
            connect_domains: ["https://api.mofei.life"],  // Allowed API domains
            resource_domains: ["https://static.mofei.life"],  // Allowed asset domains
          },
        },
      }],
    })
  );
}
Key config:
widgetCSP– Which domains the widget may call or load from.WIDGETS.blogList– The compiled HTML string (see next chapter).
📁 Full impl: src/index.ts#L14-L45
Local Dev and Testing
Config wrangler.toml:
name = "mofei-blog-mcp"
main = "src/index.ts"
compatibility_date = "2024-11-01"
Start dev server:
npm run dev
This usually runs at http://localhost:8787.
Test MCP endpoints:
# Test SSE
curl http://localhost:8787/sse

# Or HTTP POST for debugging
curl -X POST http://localhost:8787/mcp \
  -H "Content-Type: application/json" \
  -d '{
    "jsonrpc": "2.0",
    "method": "tools/list",
    "id": 1
  }'
Deploy to CloudFlare Workers
Deployment is simple:
# Login first time
npx wrangler login

# Deploy
npm run deploy
You’ll get a public URL like:
https://mofei-blog-mcp.your-username.workers.dev
Use this MCP endpoint in your ChatGPT App config.
Debug Tips
1. Use console.log
async ({ page, lang }) => {
  console.log('[MCP] list-blog-posts called:', { page, lang });

  const data = await fetch(url).then(r => r.json());
  console.log('[MCP] API response:', data);

  return { ... };
}
During local dev, logs show in the terminal. On CloudFlare, use wrangler tail:
npx wrangler tail
2. Test the three-layer data
// Temp test endpoint
if (url.pathname === "/test-tool") {
  const result = await myMCP.server.tools["list-blog-posts"].handler({
    page: 1,
    lang: "en"
  });

  return new Response(JSON.stringify(result, null, 2), {
    headers: { "Content-Type": "application/json" }
  });
}
3. Verify resource output
if (url.pathname === "/test-widget") {
  const result = await myMCP.server.resources["blog-list-widget"].handler();

  // Return HTML for browser preview
  return new Response(result.contents[0].text, {
    headers: { "Content-Type": "text/html" }
  });
}
Building the Widget Part
MCP delivers data and tools, but the polished UI comes from widgets—custom UI inside ChatGPT iframes.
Tech Choices
My widget stack:
- React 18
- TypeScript
- Tailwind CSS v4
- Vite
- vite-plugin-singlefile – the key to bundle everything into one HTML file.
Why one HTML file?
MCP resources return an HTML string, not a file path. You could reference external CSS/JS, but then you need:
- A static asset server.
- CORS setup.
widgetCSPentries for those domains.
That adds friction. A single self-contained HTML avoids all of it:
- ✅ No external deps or servers.
- ✅ Simple deploy (only the MCP server).
- ✅ Faster load (no extra HTTP requests).
- ✅ More robust (no broken asset links).
vite-plugin-singlefile packs React, CSS, and JS into one HTML string.
Widget Project Structure
Create a web/ directory:
web/
├── package.json
├── vite.config.ts
├── tsconfig.json
├── build-loader.mjs       # Generates loader.ts
└── src/
    ├── hooks/
    │   └── useOpenAi.ts   # Wraps window.openai
    ├── blog-list/
    │   ├── main.tsx       # Entry
    │   └── BlogList.tsx   # Component
    └── blog-article/
        ├── main.tsx
        └── BlogArticle.tsx
Vite Config
Use vite-plugin-singlefile:
// web/vite.config.ts
import { viteSingleFile } from 'vite-plugin-singlefile';

export default defineConfig({
  plugins: [react(), viteSingleFile()],  // bundle into one file
  build: {
    outDir: `dist/${process.env.WIDGET}`,
    rollupOptions: {
      input: `src/${process.env.WIDGET}/main.tsx`
    }
  }
});
Build scripts:
{
  "scripts": {
    "build": "npm run build:widgets && npm run build:loader",
    "build:widgets": "WIDGET=blog-list vite build && WIDGET=blog-article vite build",
    "build:loader": "node build-loader.mjs"
  }
}
📁 Full config: web/vite.config.ts | web/package.json
Wrap window.openai APIs
Create web/src/hooks/useOpenAi.ts:
import { useSyncExternalStore } from 'react';

function subscribe(callback: () => void) {
  window.addEventListener('openai:set_globals', callback);
  return () => window.removeEventListener('openai:set_globals', callback);
}

// Get tool _meta
export function useToolResponseMetadata<T = any>(): T | null {
  return useSyncExternalStore(
    subscribe,
    () => window.openai?.toolResponseMetadata || null
  );
}

// Get tool input
export function useToolInput<T>() {
  return useSyncExternalStore(
    subscribe,
    () => window.openai?.toolInput || null
  );
}
useSyncExternalStore subscribes to openai:set_globals so React re-renders when data changes.
📁 Full code: web/src/hooks/useOpenAi.ts
Build the Blog List Widget
Core logic: read data, render UI:
export function BlogList() {
  // 1) Read MCP tool data
  const metadata = useToolResponseMetadata<{
    allPosts?: BlogPost[];
    currentPage?: number;
  }>();

  const posts = metadata?.allPosts || [];

  // 2) Pagination - call API directly for speed
  const handlePageChange = async (newPage: number) => {
    const data = await fetch(`https://api.mofei.life/api/blog/list/${newPage}`)
      .then(r => r.json());
    setPosts(data.list);
  };

  // 3) Article click - ask ChatGPT to call get-blog-article
  const handleArticleClick = (articleId: string) => {
    window.openai?.sendFollowUpMessage({
      prompt: `Show article ${articleId}`
    });
  };

  return (
    <div>
      {posts.map(post => (
        <article key={post._id} onClick={() => handleArticleClick(post._id)}>
          <h2>{post.title}</h2>
          <p>{post.introduction}</p>
        </article>
      ))}
    </div>
  );
}
Interaction patterns:
- Read data – from
useToolResponseMetadata. - Page fast – widget can call the API directly for speed.
- Trigger tools – use
sendFollowUpMessageto ask ChatGPT to call another tool.
📁 Full impl: web/src/blog-list/BlogList.tsx
Build the Widget
Run:
cd web
npm run build
Vite + vite-plugin-singlefile inlines everything into one HTML:
<!DOCTYPE html>
<html>
<head>
  <style>/* all CSS inline */</style>
</head>
<body>
  <div id="root"></div>
  <script type="module">
    // all React code inline
    function BlogList() { /* ... */ }
    ReactDOM.render(React.createElement(BlogList), ...);
  </script>
</body>
</html>
This HTML is fully standalone—you can open it directly in the browser.
Generate loader.ts
MCP needs TypeScript string constants. Use a script to turn HTML into TS. Create web/build-loader.mjs:
// Read all widget HTML files
const widgets = ['blog-list', 'blog-article'];
const outputs = {};

for (const widget of widgets) {
  const html = fs.readFileSync(`dist/${widget}/index.html`, 'utf-8');
  outputs[toCamelCase(widget)] = html;
}

// Generate TS file
fs.writeFileSync('../web/loader.ts',
  `export const WIDGETS = ${JSON.stringify(outputs, null, 2)};`
);
Generated web/loader.ts:
export const WIDGETS = {
  "blogList": "<!DOCTYPE html><html>...</html>",
  "blogArticle": "<!DOCTYPE html><html>...</html>"
};
Use it in MCP:
import { WIDGETS } from "../web/loader";
text: WIDGETS.blogList  // in the resource
📁 Full script: web/build-loader.mjs
Local Widget Debugging
Method 1: Open the HTML directly
After build, open the compiled HTML in a browser:
# Option 1: command
open web/dist/blog-list/index.html

# Option 2: open the path in a browser
# web/dist/blog-list/src/blog-list/index.html
Inject window.openai in the console to simulate ChatGPT:
// Step 1: Init window.openai with all props
window.openai = {
  toolInput: { page: 1, lang: "en" },
  toolOutput: null,
  toolResponseMetadata: null,
  widgetState: null,
  theme: "light",
  locale: "en-US",
  displayMode: "inline",
  maxHeight: 800,
  setWidgetState: async (state) => {
    window.openai.widgetState = state;
    console.log('Widget state updated:', state);
  },
  callTool: async (name, args) => {
    console.log('Tool called:', name, args);
    return { success: true };
  },
  sendFollowUpMessage: async (args) => {
    console.log('Follow-up message:', args);
  }
};

// Step 2: Inject test data
window.openai.toolResponseMetadata = {
  allPosts: [
    {
      _id: "test123",
      title: "Getting Started with ChatGPT Apps",
      introduction: "Learn how to build your first ChatGPT App using MCP protocol and custom widgets",
      pubtime: "2025-11-23",
      tags: [
        { id: 1, name: "JavaScript", color: "#f7df1e" },
        { id: 2, name: "React", color: "#61dafb" }
      ],
      visited: 1234
    },
    {
      _id: "test456",
      title: "Understanding MCP Resources",
      introduction: "Deep dive into Model Context Protocol resources and how to use them effectively",
      pubtime: "2025-11-22",
      tags: [{ id: 3, name: "TypeScript", color: "#3178c6" }],
      visited: 567
    }
  ],
  currentPage: 1,
  totalCount: 20,
  pageSize: 12
};

// Step 3: Fire the event to re-render
// Important: set data first (step 2), then fire the event (step 3)
window.dispatchEvent(new CustomEvent('openai:set_globals', {
  detail: {
    globals: {
      toolResponseMetadata: window.openai.toolResponseMetadata
    }
  }
}));
Notes:
- Include all
window.openaiprops to avoid errors. - Order matters – set data, then fire the event. The widget listens to
openai:set_globals. - Runs standalone – widgets work without ChatGPT.
Method 2: Local dev server
cd web
npm run dev
It opens in the browser; inject window.openai data the same way.
Widget Best Practices
1. Handle missing data
export function BlogList() {
  const metadata = useToolResponseMetadata();

  if (!metadata) {
    return (
      <div className="flex items-center justify-center p-8">
        <div className="animate-spin rounded-full h-8 w-8 border-b-2 border-blue-500" />
        <span className="ml-3">Loading...</span>
      </div>
    );
  }

  const posts = metadata.allPosts || [];
  // ...
}
2. React to theme changes
import { useTheme } from '../hooks/useOpenAi';

export function BlogList() {
  const theme = useTheme();

  return (
    <div className={theme === 'dark' ? 'bg-gray-900 text-white' : 'bg-white text-black'}>
      {/* ... */}
    </div>
  );
}
3. Performance
- Lazy-load images with
loading="lazy". - Use
react-windowfor long lists. - Avoid unnecessary renders with
React.memo.
4. Error handling
const [error, setError] = useState<string | null>(null);

const handlePageChange = async (page: number) => {
  try {
    const response = await fetch(url);
    if (!response.ok) throw new Error('Failed to load');
    const data = await response.json();
    setPosts(data.list);
  } catch (err) {
    setError('Failed to load page. Please try again.');
    console.error(err);
  }
};

{error && (
  <div className="p-4 bg-red-50 text-red-600 rounded">
    {error}
  </div>
)}
End-to-End Flow
Summary of the full dev flow:
# 1. Build widgets
cd web
npm run dev  # Vite dev server

# 2. Debug in browser, inject window.openai data

# 3. Build widgets
npm run build  # outputs HTML and loader.ts

# 4. Build MCP server
cd ..
npm run build  # optional TS build

# 5. Deploy to CloudFlare Workers
npm run deploy

# 6. Configure MCP URL in ChatGPT and test
Debugging a ChatGPT App
After building MCP and widgets, connect to ChatGPT and debug. Three steps: host MCP, connect to ChatGPT, enable debug mode.
Step 1: Host MCP Server
ChatGPT must reach your MCP server. Two options:
A. Deploy to CloudFlare Workers (recommended)
# Deploy to prod
npm run deploy
You get a public URL:
https://your-mcp-name.your-username.workers.dev
B. Expose local server via ngrok
If you want local debugging, use ngrok:
# Start local MCP server
npm run dev  # default http://localhost:8787

# New terminal: expose
ngrok http 8787
ngrok gives a URL:
https://abc123.ngrok.io
📖 Docs: Deploy your MCP server
Step 2: Connect MCP to ChatGPT
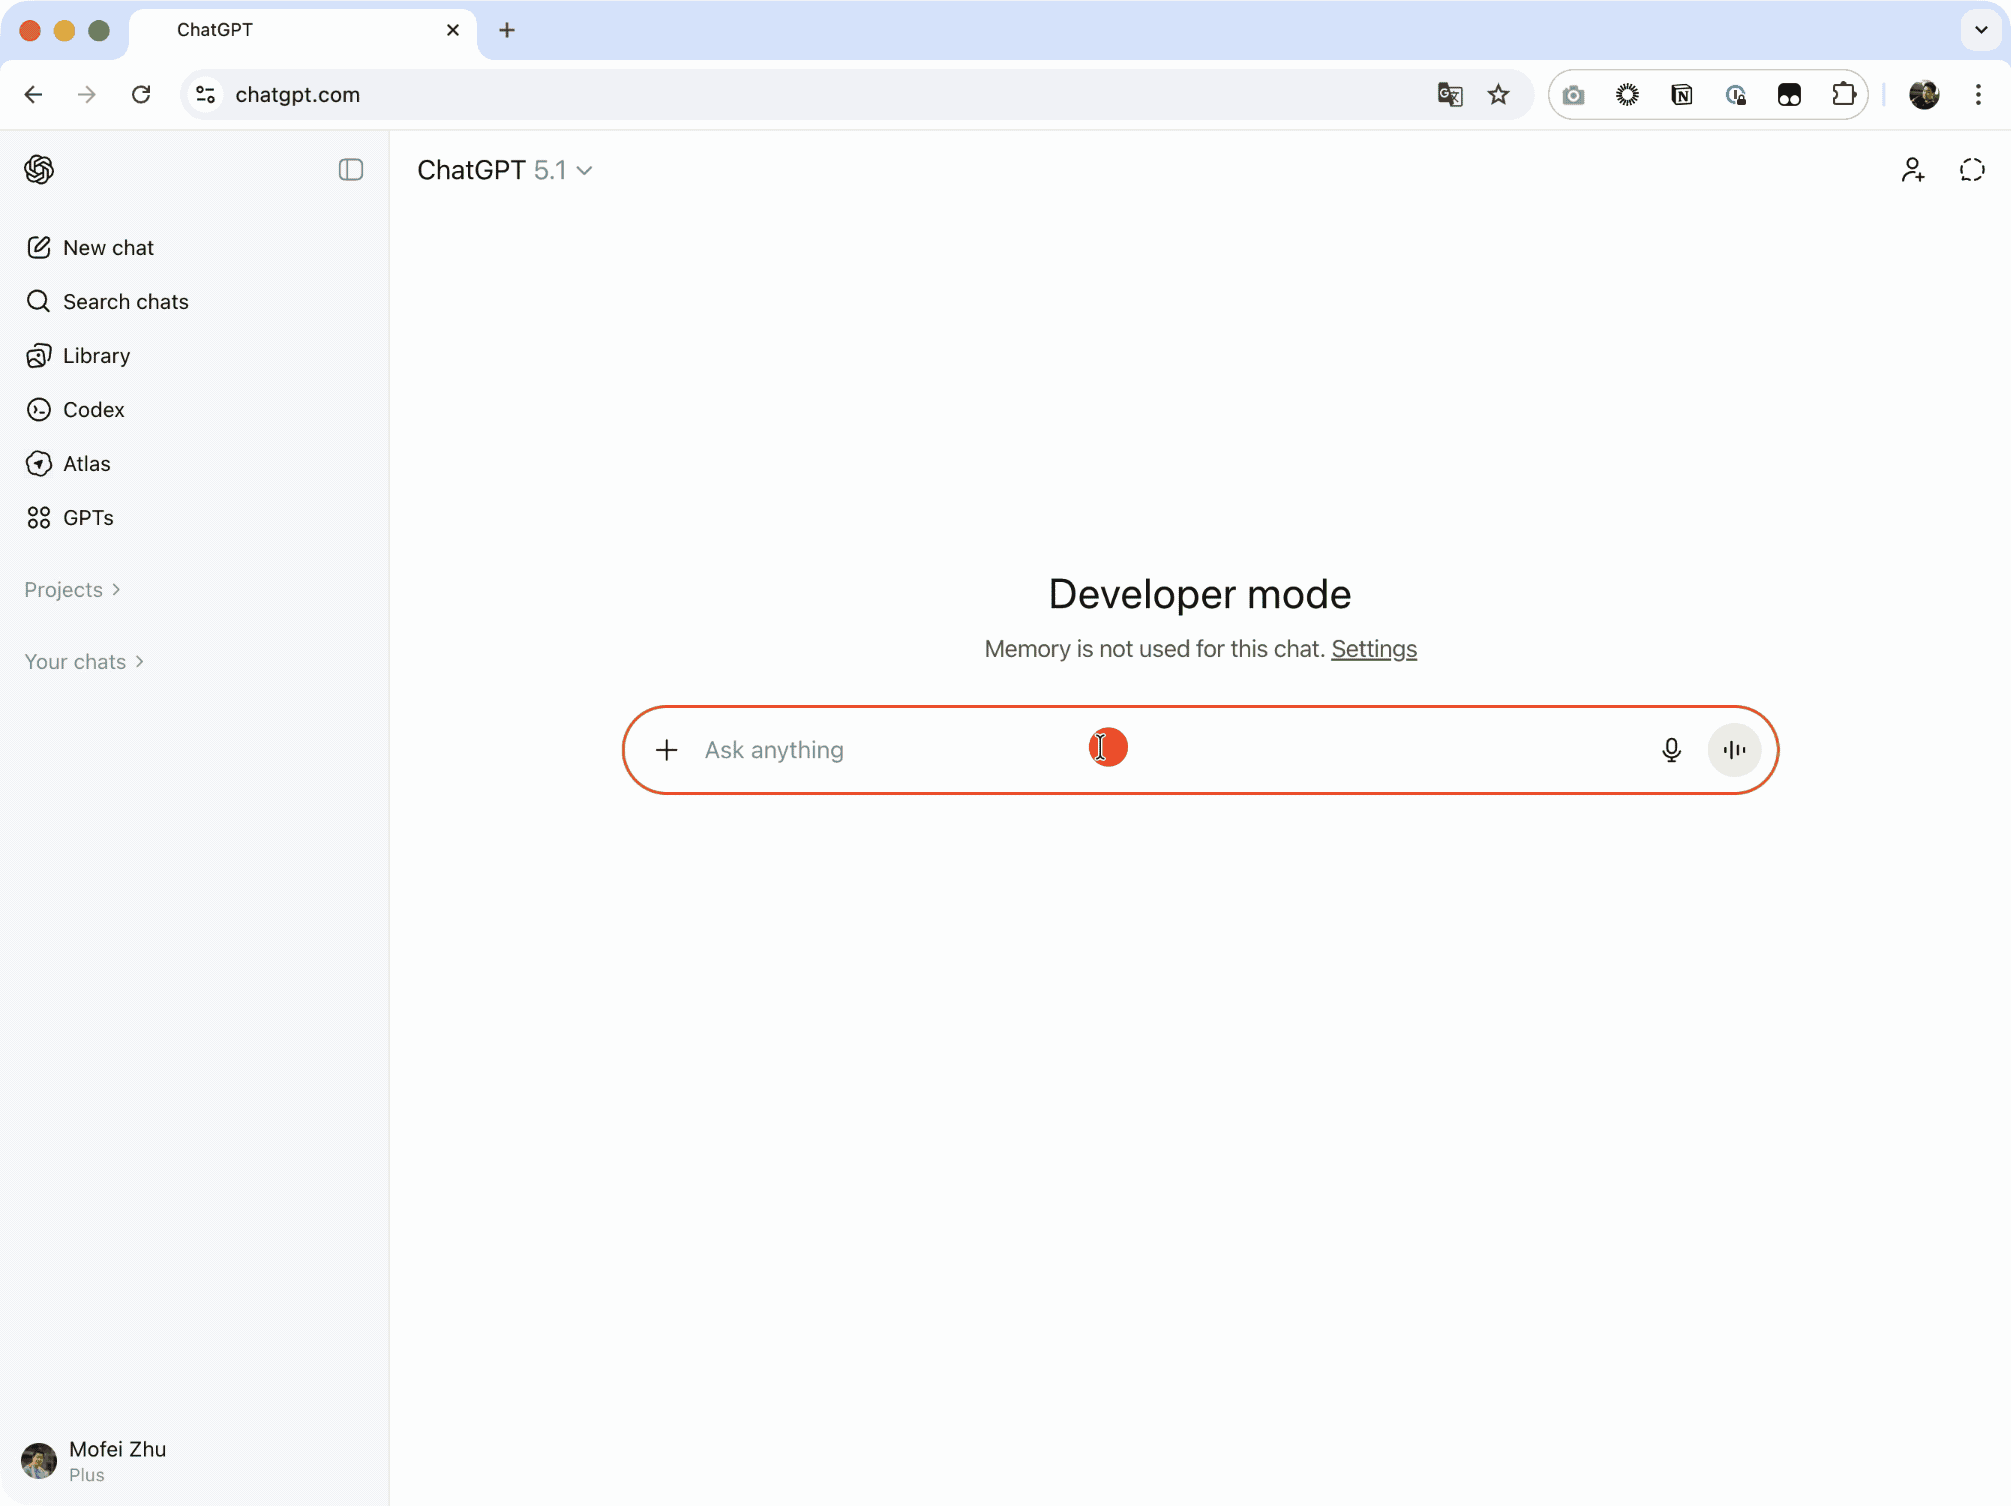
-
Turn on Developer Mode
- In ChatGPT, click your username bottom-left.
- Go to “Settings” → “Apps & Connectors” → “Advanced settings”.
- Enable “Developer mode”.
-
Add MCP server
- Click “Apps & Connectors” → “Create”.
- Set “MCP Server URL”:
# CloudFlare Workers
https://your-mcp-name.your-username.workers.dev/sse

# ngrok
https://abc123.ngrok.io/sse
⚠️ Must end with
/sse. -
Test connection Click “Test connection”; you should see:
- ✅ Tools list
- ✅ Resources list
-
Save Click “Save”.
📖 Docs: Connect to ChatGPT
Step 3: Test and Debug
Basic test:
In ChatGPT, type:
Show me the blog posts from Mofei's blog
Check the debug panel for:
- Tool called –
list-blog-postsruns. - Correct params – verify
pageandlang. - Data returned – three layers present.
- Widget loaded – UI renders.
Common issues:
Issue 1: Tool not called
Possible causes:
- Description not clear, model doesn’t know to use it.
- MCP server connection fails.
Fix:
// Improve tool description
description: "Browse and list blog posts with pagination. Use this when the user wants to see blog articles, explore blog content, or find specific posts."
Issue 2: Widget not shown
Possible causes:
- Resource URI mismatch.
- HTML has syntax errors.
- CSP blocks resources.
Fix:
// Ensure outputTemplate and resource URI match
_meta: {
  "openai/outputTemplate": "ui://widget/blog-list.html"  // In tool
}

// Resource registration
registerResource(
  "blog-list-widget",
  "ui://widget/blog-list.html",  // Must match exactly
  ...
)
Issue 3: Widget blank
Possible causes:
window.openainot injected yet.- React errors.
Fix:
console.log('[Widget] window.openai:', window.openai);
console.log('[Widget] metadata:', metadata);

if (!metadata) {
  return <div>Loading or no data available...</div>;
}
Issue 4: CORS/resource failures
Possible causes:
- CSP not set.
- Domains not whitelisted.
Fix:
_meta: {
  "openai/widgetCSP": {
    connect_domains: [
      "https://api.mofei.life",  // APIs you call
    ],
    resource_domains: [
      "https://static.mofei.life",  // Images, CSS, etc.
    ],
  },
}
Conclusion
We walked through building a ChatGPT App end-to-end: concepts, code, deploy, and debug.
Key Points
1. ChatGPT App = MCP + Widget
- MCP provides data/tools.
- Widget provides UI.
- ChatGPT stitches them together with
window.openai.
2. Three-layer data matters
return {
  structuredContent: { /* model reads */ },
  content: [{ /* chat text */ }],
  _meta: { /* widget only */ }
}
This keeps tokens low while giving the widget rich data.
3. Single-file bundle simplifies deploy
vite-plugin-singlefile makes the widget a self-contained HTML. Deployment is just the MCP server.
4. Debug mode is your friend
Developer mode shows:
- Tool calls
- Data structures
- Widget load details
- Error stacks
Why Build ChatGPT Apps
ChatGPT Apps let AI:
- 📊 Access your data – blogs, databases, internal systems.
- 🎨 Deliver custom experiences – beyond plain text chat.
- 🔧 Act as a real assistant – call real tools and services.
- 🚀 Expand endlessly – anything with an API can be integrated.
Resources and Links
Official docs:
Full code for this article:
- GitHub: mofei-life-chatgpt-app
- Live demo: search “Mofei's Blog App” in ChatGPT
My blog:
- Chinese: Mofei的博客
- English: Mofei's Blog
Final Thoughts
ChatGPT Apps are new, and OpenAI keeps improving the APIs. That means plenty of room to explore.
From curiosity to a working product, the journey was challenging but rewarding:
- I learned how AI and external systems interact.
- I mastered a full dev and deploy workflow.
- I saw more possibilities for AI apps.
If this helped you, feel free to:
- Star the repo.
- Share your thoughts.
- Pass it to anyone who might enjoy it.
Let’s explore the possibilities of AI apps together!
Keep Reading
Writing about Finland, life, and code. The next post goes straight to your inbox, without the noise.
Your feedback will help me write better posts—looking forward to it!